


Until a few weeks ago, I never felt the urge to make yogurt. I imagine it has something to do with the fact that my mom made it when I was a kid, at a time when all I wanted was the store-bought kind with fruity syrup at the bottom of every carton. But two recent events got me motivated to try my hand at culturing milk into yogurt:
1. I got a lesson in yogurt making from Siggi Hilmarsson, the founder of Siggi’s yogurt.
2. I scored a copy of the new cookbook Yogurt Culture by friend and food writer Cheryl Sternman Rule.
And so I got my yogurt making groove on and loved it so much, I thought I’d invite you in on the fun.
There’s some kind of magic in watching milk transform into yogurt with little more than a bit of heat and a spoonful of bacteria-rich yogurt from my fridge. This is just the sort of DIY I like to do with the kids, and what better time than summer when berries are in abundance and homemade yogurt is their best friend.

Below you’ll find a tutorial on how to make yogurt inspired by the method in Cheryl’s book (which is also chock full of ridiculous recipes and other yogurty tips and tidbits). Next week I’ll be sharing a recipe from the book, so get your yogurt going now. You’ll want to be ready when that recipe arrives. It’s a good one.
Homemade Yogurt 101
Here’s what you’ll need:
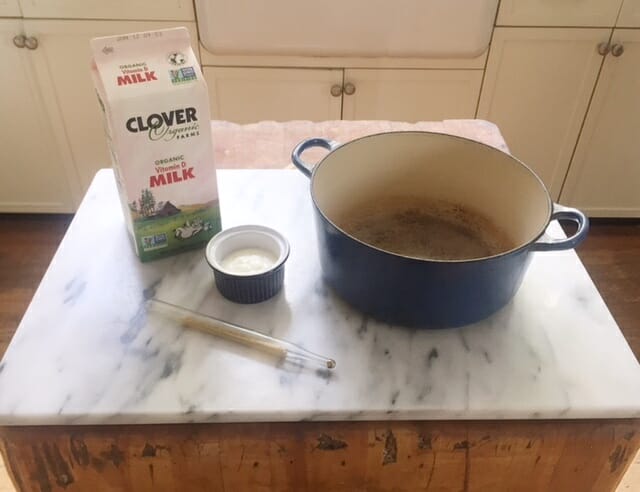
- 1/2 gallon milk (I prefer low-fat or whole milk for this; don’t use ultrapasteurized)
- 1 heavy pot with a lid that is big enough to accomodate the milk
- 1 candy thermometer or instant read thermometer
- 2 tablespoons plain yogurt (best to opt for yogurt that is fairly new to your fridge)
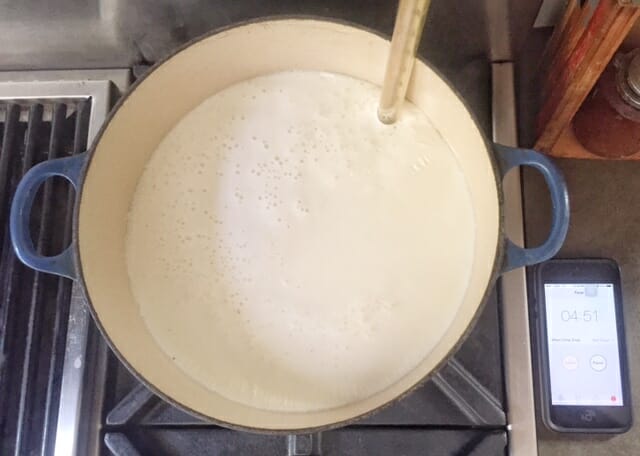
Pour the milk into the pot. Affix your candy thermometer to the pot (or be prepared to check regularly with your instant read one). Set the pot over medium-high heat and stay close by. Let the milk gradually heat up to 180 degrees F without stirring. Once it hits 180 degrees, adjust the heat down so that it stays consistently at that temperature and set a timer for five minutes. After five minutes, remove pot from heat.

Use a ladle or large spoon to skim off any skin along the top of the milk.
Leave milk to cool down to 115 degrees F. You can expedite this process, if you wish, by setting the pot in an ice bath in the sink. If the milk drops below 115 degrees F, reheat it on the stove until it returns to that temperature.
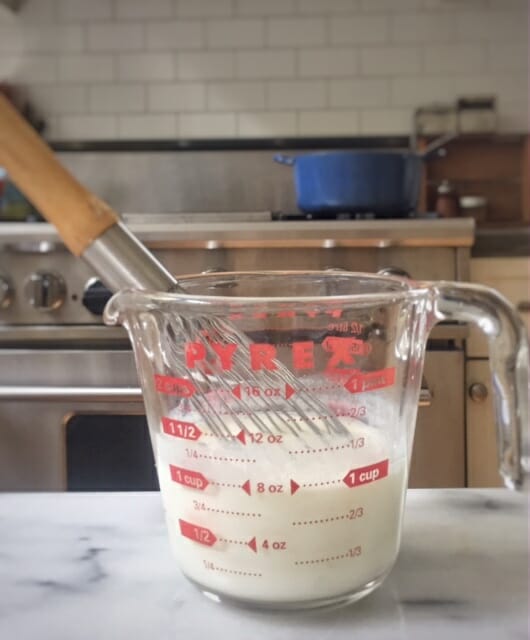 When the milk reaches 115 degrees, put 2 tablespoons of plain yogurt into a heat-proof bowl or measuring cup and add 1 cup of the warm milk to the yogurt. Whisk it until smooth.
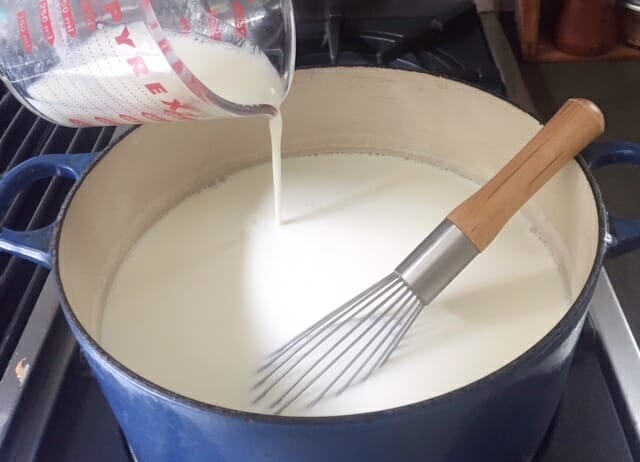 Pour the milk/yogurt mixture back into the pot and whisk well.
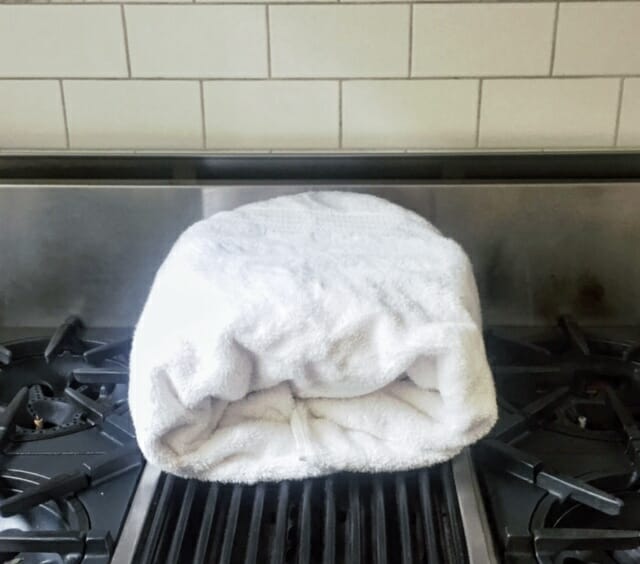
Put the lid on the pot and wrap it snug inside a generous towel. Night night yogurt.
Leave your bundled pot in a warm place to let the bacteria works its magic. Options:
- Turn on your oven light to give it some warmth and leave the pot in the oven
- Find a spot near (but not directly over ) a source of heat
- Set it on top of your stove if it’s warm there
- Put it in a sunny, low-draft spot near a window
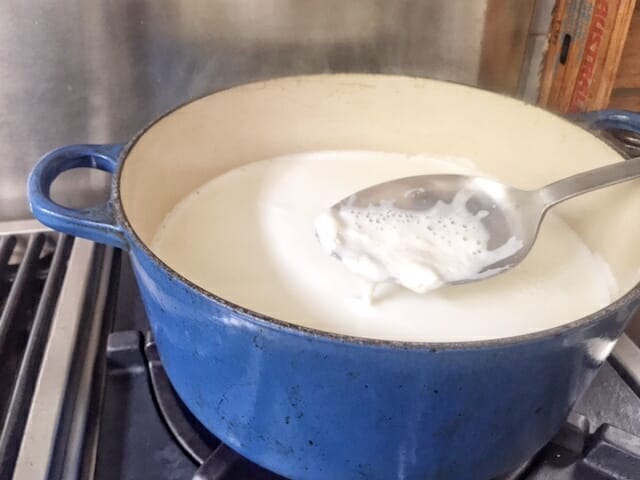
Leave your pot until the milk transforms into yogurt, approximately 6 to 12 hours (possibly longer).
When is it done? It will thicken and be creamy. You will know it when you see it (keep in mind it will thicken somewhat when chilled). In my case, I left it in the oven overnight and woke up to a batch of yogurt the next morning. The longer it sits, the tangier it becomes.
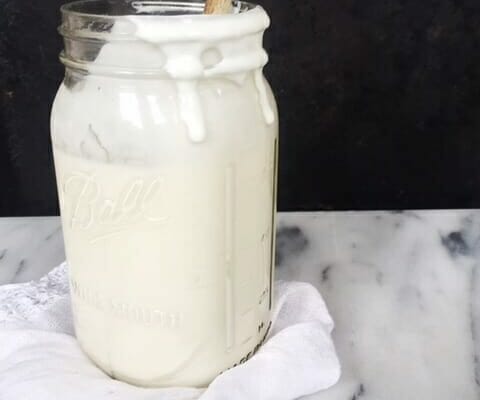
Spoon the yogurt into glass jars or containers and store in the refrigerator.
Invite friends for a yogurt party.
Or grab a spoon and tell no one.
Special thanks to Leah Walton, my dietetic intern who had a heavy hand in our yogurt making adventure.
![]()
Comments
06.25.2015 at7:39 AM #
Monica
UH-MAY-ZING!
Seeing this makes me a little bit embarrassed about buying a yogurt making gadget a long time ago that I got rid of for not using… But very excited about making my own yogurt this summer!
06.25.2015 at7:39 AM #
Katie Morford
And it goes most deliciously with fresh peaches! Hope to be seeing you this summer 🙂
07.02.2015 at10:57 AM #
Brittany Griffith
Wow! This is amazing! I was just wondering how long a batch should last in the fridge?? Thank you!!
07.07.2015 at8:27 AM #
rachel@ Athletic avocado
I love making my own yogurt, it’s so much cheaper and you can control what goes into it! Thanks for sharing 🙂
11.02.2019 at8:47 AM #
Janie Holsteen
I appreciate your emphasis on real food, your practical tips and photos, and — most of all — your recipes! I’m wondering if I could add a vanilla bean to the milk as it heats, and then take it out and scrape the seeds into the milk to make vanilla yogurt? Have you ever tried this? Would I also need to add a little high quality extract (1/2- 1 teaspoon) to the mix?
11.02.2019 at8:47 AM #
Katie Morford
Thank you Janie. I appreciate your kind feedback. And yes, I think a vanilla bean would be delicious here. I think you could taste it to see if you need additional extract, depending on how strong you want the vanilla flavor.
04.14.2020 at5:29 AM #
Kellie
I always wonder…How do I know it is “good” yogurt — as in, how do I know that it has all the beneficial bacteria in it?
04.14.2020 at5:29 AM #
Katie Morford
Great question. Here is a great write up by Harvard Health Publishing that should be helpful. https://www.health.harvard.edu/staying-healthy/your-complete-guide-to-choosing-a-yogurt-to-meet-your-needs
04.11.2022 at9:06 PM #
Dianna
I love how easy it is to make homemade yogurt. I use the heavier cream 18% milk fat or 35% milk fat. Wow it is so smooth and creamy. I don’t add any honey, I eat it plain with fresh blueberries and add a few 70% coco chocolate chips. So delicious!
04.11.2022 at9:06 PM #
Katie Morford
sounds fabulous!