


My favorite book when I was a girl was Bread and Jam for Frances. I spent many lunch hours in the school library, headphones on, listening to the story as I followed along with the pictures of the book.
Looking back, perhaps the writing was on the wall that I was headed for a career in food considering how riveted I was by certain passages. This one, in which Frances’ best friend Albert describes the contents of his lunch box captivated me to no end:
“What do you have today?” said Frances.
“I have a cream cheese-cucumber-and-tomato sandwich
on rye bread,” said Albert. “And a pickle to go with it.
And a hard-boiled egg and a little cardboard shaker of salt
to go with that. And a thermos bottle of milk.
And a bunch of grapes and a tangerine.
And a cup custard and a spoon to eat it with.
What do you have?”
Frances opened her lunch. “Bread and jam,” she said,
“and milk.”
“You’re lucky, said Albert. “That’s just what you like.”
I wasn’t sure who to envy: Albert for his multi-course gourmet lunch complete with custard cup, or Frances, for what seemed like a superbly simple jam sandwich. As a kid, I remember thinking that if her mother used good, fresh bread and homemade jam, it would be a tough choice.
This homemade berry jam would be just the sort of spread to tip the scales.
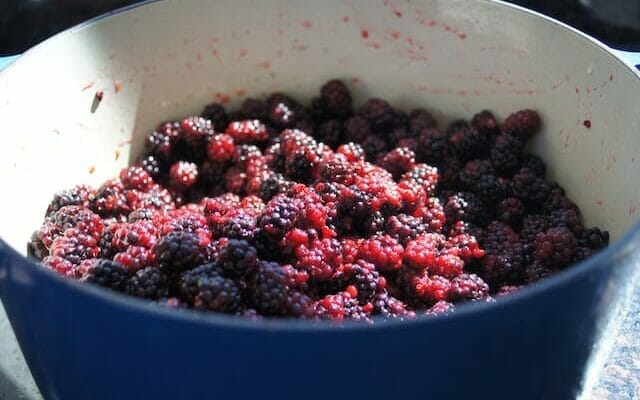
With summer berries abundant in fields and farmer’s markets, now is the time to make it. Putting up jam isn’t difficult. Really. I’m not sure there are any downsides beyond a moderately sticky kitchen. I’ve included a photo tutorial below the recipe that may be helpful. Plus, you’ll be left with a generous supply of jam and a feeling of real accomplishment having tackled such a terrific DIY project. Making jam is especially easy when you use blackberries, raspberries, or ollallieberries because there is no stemming, cutting, trimming, or peeling required. If you pick your own berries, all the better. You can find out where to do that by having a peek here.
The recipe I use is adapted from Maria Helm Sinskey’s approach laid out in her book Family Meals. She uses the natural pectin of apples to gel her jam rather than powdered pectin from a box. How cool is that? My recipe departs from Maria’s on two points: 1) Since I like my jam on the tangy side, I use less sugar. You can add more if you like, particularly if your fruit isn’t especially sweet. 2) In addition to sterilizing the jars before filling them I also boil the jam jars once filled as one extra precautionary step. That’s how my mom always did it, and I suspect, Frances’ mom, too.
Very Berry Homemade Jam
Ingredients
- 4 pounds blackberries , ollallieberries, raspberries, or strawberries that have been washed and picked of any stems or debris (strawberries should be stemmed and sliced)
- 2 large apples , cored and grated (ok to include the peel )
- 2 pounds sugar
- Special equipment: Ten 8-ounce canning jars such as Ball Jars (you may not need them all, but better to have too many than too few); a good pair of tongs, preferably with rubber tips, or canning tongs.
Instructions
-
Remove the lids and metal bands from the jars and put them, along with the jars, into a large, heavy pot. Cover by at least 1 inch with water and bring to a boil. Boil for 1 minute. Remove from heat.
-
Use a clean pair of tongs to carefully remove the jars from the water and let them dry on a clean dish towel on the counter. Leave the pot with the water on the stove. You will need it later.
-
Put 1 small plate into the refrigerator to chill.
-
Into another large, heavy-bottom pot, mix together the berries, grated apples, and sugar. If the berry mixture fills the pot more than halfway, divide the mixture into two pots. The fruit will bubble and spatter as it cooks and it is best not to have a very full pot.
-
Turn the heat to high, and cook, mashing and stirring occasionally, until the berry mixture comes to a boil.
-
Boil for about 15 minutes, skimming off any pink foam that settles on the top with a large spoon. Discard the foam. Stir the jam regularly. As the jam begins to thicken, stir continually so it doesn’t stick to the pot.
-
When the mixture thickens and feels heavy as you draw a spoon across the bottom of the pot, you are nearly there. To test for doneness, spoon a little jam onto the chilled plate. It should have body to it and shouldn't run too much on the plate. If it needs further cooking, let it boil another five minutes and check again. Continue until it is done, keeping in mind that the jam will thicken considerably once it cools.
-
Once the jam is done, remove from heat. Use a supremely clean ladle to spoon the jam into the jars, filling them nearly to the top. Wipe the rims of the jars with a damp cloth. Set the lids on top, add the bands, and screw them shut. Put the jam jars into the pot of water you used to sterilize the jars. Add more water if needed so it reaches an inch over the top of the jars. Bring to a boil over high heat and boil for 10 minutes. Let cool for 5 minutes.
-
Use the tongs to carefully remove the jam jars and set them upright on the counter. Press the lids down to be sure they are slightly concave, which means they are properly sealed. Store jam in the pantry for up to 1 year. If a jar isn't properly sealed (has a lid that bulges upwards) it should be stored in the fridge and used within 3 weeks.
![]()
Adapted from Family Meals by Maria Helm Sinskey
Comments
08.22.2012 at8:38 PM #
kim brady
Katie, You rock! Thanks for breaking it down and making it look so easy- I may actually make my first batch of jam on my own- or with a little help from my LO. BTW I loved my mom to read me Bread and Jam for Frances too.
08.22.2012 at8:38 PM #
Katie Morford
I hope you do make your first pot of jam. Then, spread it on a slice of bread for your LO just like Frances.