


Mr. Mom’s Kitchen lived in the UK for four years where he got hooked on Scotch eggs and haggis, and developed a taste for the English toastie: a crispy sandwich made in an electric press. Consider it the smaller, humbler cousin of the Italian panini.
Long before we had children or any money to blow on cooking appliances, he picked up a slightly busted but functioning toastie maker at a garage sale for a dollar, still greasy from its prior owner. He was delighted with himself and has been churning out toasties ever since. And while it has been washed dozens of times over the years, I can’t get past its grimy origins, and fantasize about owning a real panini press, one of the spectacular looking industrial ones. But they are expensive and honestly, another kitchen gadget isn’t high on my list.
So, when my friend Humaira told me she’d been using her waffle iron as a Panini press, I was all over it. It wasn’t surprising coming from a woman who is a fashion stylist and knows how to rework what you already own. She was over one day to help me give my closet an overhaul. While listening to me grumble over a particular skirt that was too big and I never wore anymore, she yanked the skirt up to my armpits, added a belt and voila: a new strapless dress.
I couldn’t wait to put her waffle Panini idea into practice. The next morning I was up gathering ingredients for a breakfast sandwich that included scrambled eggs, spinach, and Jack cheese. The kids (ok and me too) snarfed those down like nobody’s business.
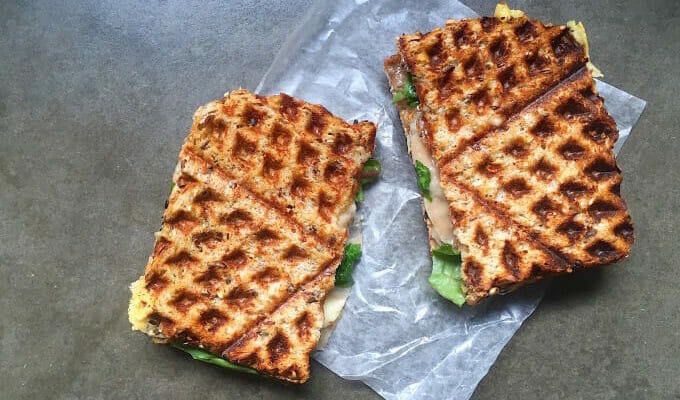
Come lunchtime, I was at it again, this time with sharp Cheddar, thinly sliced ham and more spinach, done up in this Waffle Iron Panini.
By dinnertime I had to hide the waffle iron from myself lest it become a three panini day.
Try this grilled cheese panini...made in your waffle maker! (I promise, it works like a charm.) Share on XJust as Humaira had promised, the waffle iron works like a charm. As for Mr. Mom’s Kitchen, he remains loyal to his beat up and beloved toastie maker.
Waffle Iron Panini
Ingredients
- 2 thin slices sharp Cheddar cheese
- 2 slices whole wheat bread
- Small handful baby spinach
- 1 slice ham , preferably nitrate-free
- Extra-virgin olive oil or non-stick olive oil spray
Instructions
-
Preheat the waffle iron.
-
Put 1 slice of the cheese on 1 piece of bread. Top with the spinach followed by the ham and the remaining slice of cheese. Set the other slice of bread on top.
-
Grease the waffle iron with the olive oil or olive oil spray. Put the sandwich in the waffle iron and press down firmly. If your waffle iron has a latch, press again until the latch clicks into place. Cook until the waffle is brown and crispy. Remove from the waffle iron and cut in half.
P.S. This isn’t the only thing you can make in the waffle maker! Try this Ham and Cheesy Greens Panini or if you’re more traditional, check out my formula for making the most delicious DIY grilled cheese sandwiches.
Comments
06.08.2011 at5:08 PM #
Trina
After reading that I didn’t have to make a waffle for the bread, I got hooked on this fabulous idea! I think this is a great way to get my boys involved in making their own waffle paninis too. Maybe they can cook and you can give me tips you learned on how to repurpose my closet!
06.08.2011 at5:08 PM #
Katie Morford
It’s a deal. Let me know how it goes with the boys.