


“It’s only October and I’m already so over the lunches.” That’s a one-liner I overheard last week while standing amongst a throng of parents waiting to pick up our kids up after school. What are we, six, eight weeks into school and already burnout is setting in? What’s a parent to do? Here’s what…my number one secret to keeping your school lunch groove on:
HARNESS YOUR LABOR FORCE!
Whether you have kids who are pint-sized, preteen, or on the verge of fleeing the nest, getting them in on the action is the best way I know to keep things fresh, fun, and less taxing for you. Here’s why:
- Kids are so capable! Even those as young as four or five can pitch in, alleviating some (and eventually all) of the responsiblity for the job.
- They will more likely eat what they had a hand in packing.
- It can be a pretty sweet way to spend time together.
- In the process, your kids will develop some real skills in the kitchen.
Now for the reality check: It takes a little investment of time to get them going. And let’s be honest, if you have preschoolers or younger grade schoolers, you will need to be close at hand to get the job done right (and safely).
In the interest of sending your kids down this path of lunch packing independence, I’ve developed three lunch box-friendly recipes to get them packing.
The recipes are all
- A departure from the same-old, same-old sandwich
- Entry-level easy
- Include five ingredients or less
- Have a little bit of a fun factor.
Each recipe will feature a photo tutorial with a printable recipe basic enough for kids to follow along. The first recipe is a Ham and Cheesy Greens Flatbread Panini, all done in a waffle iron (or panini press if you own one). Stay tuned for next week when I’ll share lunch packing tips for kids along with two more recipes. So…
LET’S DO THIS!
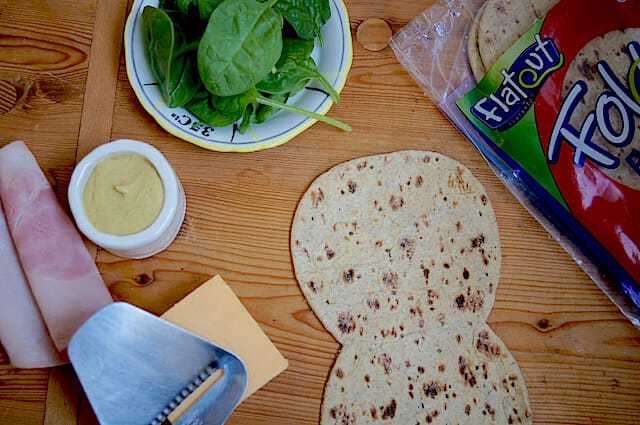
1. Grab a kid (or three) and gather your ingredients
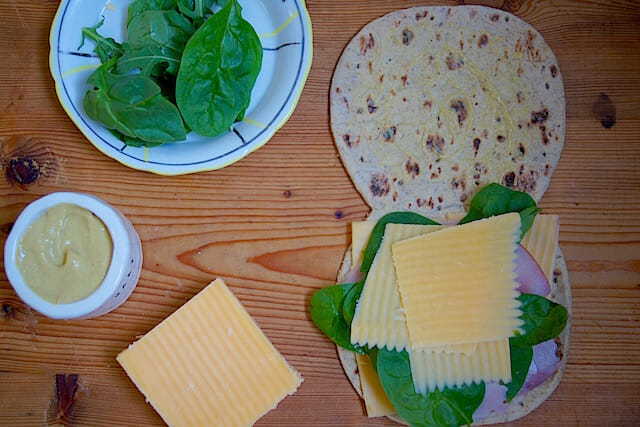
2. Help younger ones cut the cheese (watch that 1st grader humor, lady). Let them layer on the ingredients with a smear of mustard across the top.
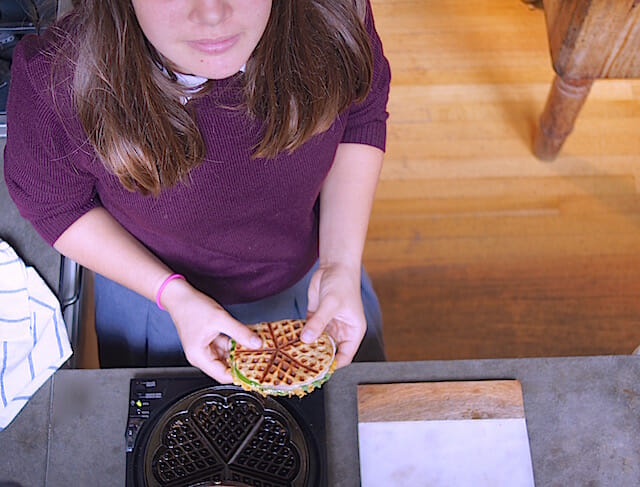
3. Have the kiddos fold over the top. Get it into the waffle iron (littler ones will need help with the hot iron).
4. See if you can get them to wait for lunch to eat it. YUM!
Ham and Cheesy Greens Flatbread Panini
Ingredients
- 1 small whole-grain pita (see note)
- 1 to 2 teaspoons favorite mustard
- Enough thin slices of sharp Cheddar cheese to cover the flatbread in 2 layers
- 1 thin slices ham
- Small handful arugula, baby kale, or spinach
Instructions
-
Heat your waffle iron. Coat lightly with oil or non-stick cooking spray.
-
While the waffle iron heat up, lay open pita on your work surface. Spread mustard over half of the flatbread. Lay half of the cheese over one-half of the pita. Lay the ham on top, followed by the greens. Cover with the remaining cheese. Cover with the top of the pita.
-
Carefully set the pita in the center of the waffle iron and press the lid down firmly. Cook until the pita is lightly brown and crispy
-
Remove and leave whole, or cut in half or quarters, as desired.
http://www.momskitchenhandbook.com/wp-content/uploads/2015/10/FullSizeRender.jpg
Comments
10.16.2015 at8:25 AM #
Lindsay @ The Lean Green Bean
first of all, that panini maker makes this WAY fun. second of all, delicious- can’t go wrong with ham and cheese!
10.16.2015 at8:25 AM #
Katie Morford
Agreed, Lindsay. And who needs a proper panini press when you’ve got a waffle iron!
10.16.2015 at11:59 AM #
carrie
almost disappointed i am reading this on a friday! can’t wait to try this out on monday. 🙂
10.16.2015 at11:59 AM #
Katie Morford
Awww…that’s so sweet. There’s no rule that you can’t have this on a Saturday 🙂
10.16.2015 at5:21 PM #
Jessica @ Nutritioulicious
Love this so much! I definitely need to have my girls do more of their own lunch making! Those Flatout Foldits are so cute!
10.16.2015 at5:21 PM #
Katie Morford
Yours are still pretty little, Jessica, but it’s never too early 🙂
10.17.2015 at2:27 PM #
Vi Dang
Simple and quick recipe! My kind of recipe. I noticed the sandwich was wrapped with some sort of paper. Where did you buy that? Plus, where did you get your cheese grater? I usually use the box cheese grater. We Asians don’t eat lot of cheese. Any tip as to how to keep the cheese block last longer in the fridge. My daughter doesn’t like ham. Can I substitute it with grilled chicken?
10.17.2015 at2:27 PM #
Katie Morford
Hi there
I use wax or parchment paper bags. You can find them in Whole Foods, some supermarkets, and other specialty stores. They are compostable/recyclable. Those cheese slicer are pretty common. You can find them in any kitchen supply store, some supermarkets, and certainly on Amazon. Cheddar will last a pretty long time wrapped in plastic and stored in the fridge. If mold appears, you can simply slice it off and use the remainder of the cheese. This sandwich lends itself to tinkering, so chicken would be great here.
10.19.2015 at5:09 AM #
Katie @ Mom to Mom Nutrition
This is amazing Katie! I love how you a. gave your kids the tools to make a healthy lunch and b. made this sandwich in a waffle maker! So cool! My kids might not be in school just yet, but we are switching up our grilled cheese routine this week 🙂
02.13.2016 at8:26 PM #
Yeyis
They look SO very good. We don’t have them in our stores here. We do have the Flat Out Bread but in just one store. I tried to order these on line and they are OUT of stock.Love your blog posts,Susie
02.13.2016 at8:26 PM #
Katie Morford
Thanks Susie.